Cloud-based demo
This is a quick demo mostly intended for non-technical users who don’t want to setup their own server.
- Use our contact form to request a demo access
- Open the URL provided by our representative
- Enroll the mobile device (see below)
Set up an on-premise server
The preferred OS for installation of Headwind MDM is Ubuntu Linux (other platforms are also supported but require a custom solution).
Here’s a quick start on Ubuntu 20.04.
Installation video
Prepare the server
- We recommend purchasing a virtual machine by any cloud hosting provider (AWS, DigitalOcean, etc.). Recommended parameters are 4 Gb RAM, 2xCPU, 20 Gb SSD.
- Setup a (sub)domain name and assign it to the IP address of your server.
- If the hosting provider has a firewall, open the required ports.
- Configure SSH access (setup is done through the SSH console).
Installing the server software
- Download the latest version or clone the project on GitHub and compile
- Install the required software (Apache Tomcat, PostgreSQL, AAPT)
- Create the database connection
- Run the installer script (hmdm_install.sh) as root (see details)
- Open the URL provided by the script in the browser
Enrolling the device
Before enrollment, tap an icon with a “QR code” in the “Configurations” section. You must get a QR code for enrollment.
Note: the default device ID is h0001 (if you’re using a cloud demo, the device ID will be different). You can embed the device ID in the QR code and simplify the enrollment process.
To enroll:
- Use a new Android 7.0+ device or reset to factory settings
- Tap 6 times on a startup screen (for example, on a “Hello” text)
- Setup the Wi-Fi connection
- Scan the QR code
- Let the application be downloaded and installed by the managed provisioning tool
- Grant the permissions the application requests
- Enter the device ID if the application asks for it
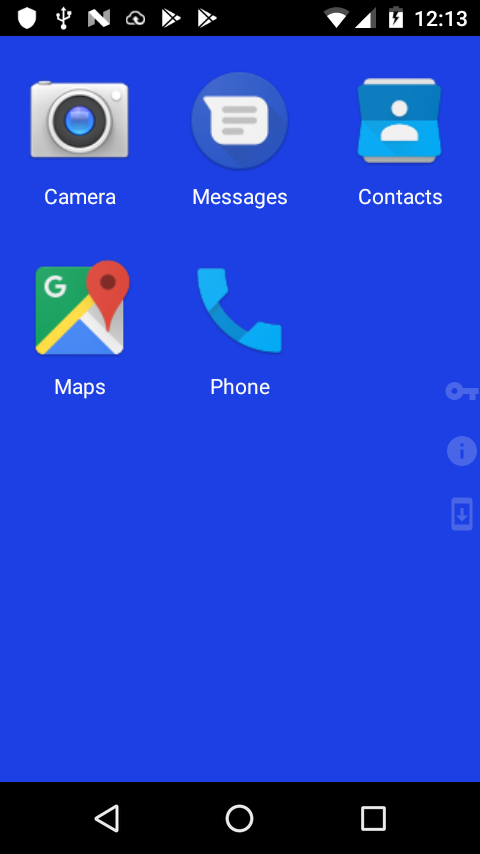
At the end, you should see a desktop like this:

Congratulations! You’ve successfully enrolled the device.
Can’t reveal the QR code scanner?
QR code based enrollment is not available on Android 6 and below, Xiaomi, and Huawei running EMUI 5 and below.
Do not worry, you still can install Headwind MDM as an ordinary APK file, see details here.
Here’s the related video manual:
Deploying your application
If you have more devices to test, repeat the enrollment procedure described in a previous paragraph.
Your application must be available as an APK file (deployment from Google Play is not supported).
- Give a unique name to your APK, for example, myawesomeapp-1.05.apk (use the descriptive name and version, avoid using default names provided by Android Studio!);
- Sign in to the web control panel;
- Open the “Applications” tab and click the “Add” button;
- Select the APK file of your app and wait until the file is uploaded to the server;
- Type the application name (to find it later in the web panel);
- Set the “Display icon” checkbox as well as other optional parameters*, and click “Save”;
- You will see a list of configurations. Select “Install” near the required configurations and click “Save”.
*Notice: System app is the app preinstalled on a device, this checkbox shouldn’t be set for uploaded APKs. Run after install must be set for apps requiring interactive actions like permission grant at first start. Run at boot must be set for apps running background services.
Now the configuration is ready to deploy. You can either click the “Update” icon on each of your devices, or just wait: all devices must download and install the new app within 15 minutes.
Notes
1. System apps are the apps already preinstalled to your device. They do not require uploading APK, but you must allow or forbid user to open them. All system apps are forbidden by default.
2. You can choose whether the app icon is displayed on the mobile device desktop. Some apps (for example, service apps) may be hidden and you do not need to display the icon on the desktop.
Updating the app version
Updating the app is easy and pretty similar to the deployment of the new app. Just upload the new app version in the “Applications” section and follow the app deployment instructions.
The app versions may be managed by clicking the “Manage versions” button at the right-hand side of the application.
Managing the app state
You can choose whether you want to allow, forbid or remove the application.
- Open the “Configurations” tab and click the “Edit” action at the right-hand side of your configuration;
- Inside the configuration editor, open the “Applications” tab;
- Click “Add” and start typing the application name or package ID until you find your application in the dropdown list;
- After you select the application, you will see the options. Select “Install” and “Show icon” options in the dropdown list and click “Add”;
- Save the configuration by scrolling the app list down and clicking “Save”;
Note: you can try to remove unnecessary system apps (bloatware). They will be removed if it is technically possible.
Entering the administrator menu on the device
To exit managed mode and enter the administrator menu, tap and hold a semi-transparent key icon at the right center of the screen, then enter the password. An alternative way is to swipe down from the status bar and type “Settings” icon and then “Administrator”. The default password is 12345678, which is configured on the server in: Configurations – Edit configuration – General.
To exit kiosk mode (available in the Enterprise Edition only), tap 4 times on the top left screen (there’s a transparent key icon, and you’ll hear a click when tapping).
To exit the administrator menu, simply reboot the device.
After testing, you may wish to restore the device from the managed mode to the normal mode. This can only be done by factory reset.


